

Showing posts with label 101 Gift Wrap. Show all posts
Showing posts with label 101 Gift Wrap. Show all posts
Wednesday, May 09, 2012
DIY: Altered Kraft Paper Gift Boxes


Saturday, December 17, 2011
Dollar Saving Holiday Ideas
 Here is an interview I did for Real Simple magazine.
Dollar Saving Holiday Ideas: WRAPPING SUPPLIES
Gift Tags: Recycled last years holiday cards into gift tags by using a decorative punch or cutting a traditional tag shape.
Glittered Pinecones: Add a touch of nature to a package by tying on small pinecones and twigs. We like to add a little pop with Mod Podge and brown glitter to the tips of pinecones.
A Leg Up on Wrapping: Create a denim wine bag with the leg of an old jean. Just cut the leg to the appropriate height for your bottle. Sew or staple across the bottom. Use a ribbon to tie the bag closed.
Tins: Use Mod Podge to decoupage out-of-season (or style) tins and boxes into modern gift boxes by attaching decorative paper to the outside.
Gift Bags: Create simple gift bags with a punch of color with plain paper “lunch” bags. Cut a scalloped edge across the top of a plain paper bag, punch holes across the top and thread closed with a pretty ribbon, tie the ends into a bow.
Photocopied Paper: For small gift-wrap jobs you can make your own color copied paper collages. For extra savings use color paper on a black and white printer.
Kids Art: Decorate large rolls of butcher paper with kid’s holiday drawings. Let the kids know whom the package is for and have them draw something special for them. I bet this paper doesn’t get torn and tossed.
Yarn Tied: Pass on ribbon and say yes to yarn. Look for big bold yarns to tie up your packages. Way cheaper than ribbon!
Dollar Saving Holiday Ideas: ORNAMENTSDollar Store Decor: Dollar store ornaments can become very stylish with a spray of high gloss paint. We like to use 3 different colors of spray paint on different sized and shaped ornaments. Krylon has tons of bold new colors available, everything from candy colors to natural colors. (Both color pallets blend well with traditional silver and gold)
Papered: Origami paper ornaments and garland can be made for pennies. For “book lovers” you could use pages from old books (just make sure they are not valuable). For a “kids” tree you could use the funny pages to make a humorous statement.
Darn Yarn: Pompoms are easily made with just a few winds of yarn. Use sparkly metallic yarns in taupe, gold, white and silver to create a homespun elegant look. Add Yarn bows to inexpensive clear ornament balls to counter balance the pompoms.
Rocker At Heart: Glue broken bits of CD’s to silver Styrofoam balls and add a ribbon hanger to create a disco ball ornament. Adorn a small tree with disco balls and guitar picks.
Scents of Cinnamon: Tie bundles of cinnamon sticks and small twigs together with ribbon and hang from a tree.
Baked Dough Saves Dough: Kids love playing with dough and creating homemade ornaments with salt dough (made for a few dollars at home) is a fun way for families to get creative together.
Dollar Saving Holiday Ideas: HOLIDAY DECORATIONSBranches & Birds: Use metallic spray paint to spruce up large and small broken tree branches, place in a glass vase and hot glue white birds to the branches.
Papered Garland: Working with old holiday cards or scrapbooking paper, punch decorative shapes with oversized punches (or trace around a glass and use scissors), attach the tops to a long piece of ribbon using hot glue. Add stickers to spell out holiday words like, Noel, Joy and Merry Christmas.
Can You Picture: Remove the glass and backing from oversized frames, paint with high gloss spray paint in rich plum and silver colors, dangle ornaments and family photos from the center with pretty ribbon. Perch the frames on a mantle or hang on the wall.
Pomanders: Create a centerpiece with stacks of oranges, grapefruits and lemons. Add cloves and lemon leaves for color and scent.
Candle Glow: Add drama to plain candles by inserting decorative brads into the sides. You can get rhinestone, snowflake even pearl brads.
Wrapped Wreath: Create a fabric wreath by cutting strips of 4 or 5 different fabrics into 1” wide pieces. (We like to use a monochromatic color pallet and different textures of fabrics – like, wools, cottons, corduroy, etc.) Wrap the strips around a wire wreath form until the wreath is covered. Add a few old ornaments to the center and you are ready to hang.
Tree Trimming Garland: If you are decorating a fresh tree, collect the trimmings and wire them together to create a mantel or door garland.
Dollar Saving Holiday Ideas: HOLIDAY CARDSShop Sales at the End Of The Season: We always purchase cards on clearance for 75 – 90% off the retail price at the end of the season.
Make Your Own: Begin with blank cards and add simple scrapbooking embellishments, photos, even a kids hand print.
Vintage Flair: Make black and white copies of a favorite family photo, use colored photo makers to add highlights to the picture.
Go High Tech: Send your cards using an online greeting card program or create your own jpegs greeting and email to friends and family.
Dollar Saving Holiday Ideas: HOSTESS PARTY GIFTSMini Makeover: Rewrap inexpensive soaps or votive candles with pretty papers, create a designer look by adding fun bows and embellishments.
Recipe Swap: Do you have a friend that always loves your cooking or baking? Make him or her a set of recipe cards.
How Does your Garden Grow?: Do you have a great indoor herb garden? Create an herb gift of either fresh cut herbs or home dried herbs. Your friends will beg for more!
Mini Breads: Bake a large batch on mini breads to have on hand during the season (they freeze well) wrap with butcher paper, add a yarn or ribbon tie and give as needed.
Party Pics: present your hostess with a small empty photo album and let her know that you have brought along your camera to be the official photographer as a gift to her. Make sure you have the pictures printed within one week of the party.
Dollar Saving Holiday Ideas: HOLIDAY SHIPPING
Ship Early & Light: Don’t get caught with last minute (high dollar) shipping prices.
Junk Mail Revamped: Use shredded junk mail instead of store bought peanuts.
Popped Up Packing: Old fashioned popped popcorn can be used as packing peanuts – just don’t add salt or butter. Forget trimming the tree with popcorn – time is money – trust me I tried it before.
Don’t Toss The Boxes: Recycle boxes from retail stores for shipping boxes. Just make sure they are thick enough cardboard.
Tuesday, March 15, 2011
Altered Champagne Glasses and JuJu Belle Bracelets

JuJu Belle Bracelets
Wrapped in Altered Champagne Glasses!
Doctored and decorated plastic champagne glasses are the perfect little vessel for holding a precious gift. They can be adorned to the nines or simply-made with fine tulle and a sophisticated bow.

Bridal season is always just around the corner and this gift wrap idea is perfect for wrapping bridesmaids gifts. They make quite a statement when displayed as a group or on a party tray - recipients will ohh and ahh as they pull the ribbon ties.


Gotta LOVE the Dollar Store!
I purchased most of the items for the wrapping at my local dollar store. The glasses were 8 for $1. The hot pink tulle was for wrapping gift baskets. I used three $1 packages for 8 glasses. The Aurora Borealis shred is for filling Easter baskets. I only used 1/4 of the $1 package. The star garland was a buck too! The only things from my craft stash (or the craft store) is the scrap-paper punches, pearls, pink gift baggies and ribbon.
The baubles are from my friend's company JuJu Belle. They have the cutest mix and match Trinkets, Rhinestone Alphabets, Charms, Beads and a big variety of chains for necklaces and bracelets. I just got a sneak peek at the crafty themed charms and they are SOOOO cute! I am giving the bracelets as gifts to a group of women I am working with. I chose to go with the same theme for each woman because I wanted them all to match.


I also packed each one in a sheer bag for jewelry box storage.

One thing I love about her line is that each charm comes with a clasp so you can easily clip and mix and match charms with bracelets or necklace bases. You can load up with charms or just wear one.
Are You Ready to MAKE or WHAT?
What You Need For Each One:
Plastic Champagne Glass
14X14 Piece of Tulle
Chip Clip7" Crepe Paper Streamers
Hot Glue
7" Star Wire Streamers
Scrap-paper Punched Circles
Flat Backed Pearls or Rhinestones
14" Ribbon
Pretty Basket Shred

Remove the base from the glass, flip upside down and pierce the stem through the center of the mesh tulle.

Gather the top together and clip with a chip clip.

Hot glue crepe paper streamer around the base of the glass. This will secure the tulle and add a decorative ruff.

Push the paper into the glue to create pleated ruffles.

Hot glue one end of the star wire streamer to the center of the paper ruff.

Wrap the wire trim around the stem and secure the end with hot glue.

Position a scrap-paper circle over the tipped end of a hot glue gun helper press wand or the tip of a blunt pair of scissors. Press the side down to form a flower shape.

Position the paper circle over the beginning and end of the star trim and hot glue in place. This will cover the ends of the wire trim.

Hot glue a pearl or gem in the center of the paper circle.

This is what the glass should look like so far.

Place the base back on the glass and hot glue a strip of ribbon around the seam.

Remove the chip clip, trun the glass right side up, fill the glass with a palm-full of basket shred and place the gift in the glass.

Gather the tulle and tie with a bow! Trim the ends of the ribbons and tops of the tulle.

Make more!
Saturday, January 01, 2011


Friday, September 11, 2009
Wrap it: handmade gift bags
 Wrap it: handmade gift bags
 Simple clay tags and rustic embossed stamps give gift bags some organic style.
Materials:
Delight modeling paper clay
Wax paper
Rolling pin
Food grade silicone spray
Nature rubberstamps – leaf designs
Craft scissors
Bamboo skewer
Pearlizing medium – by Plaid
Craft paint
Small paintbrushes
Inkpads
Distressed embossing powder—by Ranger Ink
Heat gun
Kraft paper gift bag
Twine or waxed cotton string
Ribbon
Hot glue
Steps:
1. Place the paper clay in between 2 layers of wax paper and use a rolling pin to roll the compound to ¼ inch thickness.
2. Remove top layer of wax paper, and spray the stamp with food grade silicone spray to prevent sticking. Stamp nature images into the compound.
3. Using a pair of craft scissors to carefully cut around the stamped images. Punch a hole in the wet paper clay with a bamboo skewer. Allow to air dry for 2 days.
4. Add the pearlizing medium to the craft paint and mix well. Paint the mixed paint and medium onto the leaf shape. Add highlights by using gold craft paint mixed with pearlizing medium. Allow the paint to dry.
5. Rubber stamp the gift bag using the same stamps. Use different colors of ink and emboss some of the stamps with embossing powder and a heat gun. Work over a manila file folder to catch stray powder and funnel it back into the canister.
6. Thread the leaf on a piece of twine and tie to the bag.
7. Hot glue more leaves onto note cards.
Make it: Silk Flower Gift Tags

Make it: Silk Flower Gift Tags
Put the petal to the metal with silk flower gift tags that make any present pop.
Materials:
Silk flower
Colored cardstock
Hole punch
Markers or pens
Scissors or large punch
Shank button
Thin ribbon
Steps:
1. Disassemble a silk flower. If the shank of your button is bigger than the hole in the center of each petal piece, enlarge the holes with your scissors.
2. Create a tag with colored cardstock – either cut out a shape or use a paper punch. Punch a hole in the tag. Write the recipient’s name on the tag.
3. There are two ways to assemble the flower gift tag. The first way is to have the paper tag in the center of the flower. The second way is so that the paper tag is underneath the flower, poking out on one side. To assemble the gift tag the first way, place the paper tag on top of the petals, lining up the holes in the petals and the hole in the paper tag. Poke the shank of the button through the holes and thread a piece of thin ribbon through the shank. To assemble the tag the second way, follow the above steps, but place the paper tag underneath the petals rather than on top of them.
4. Tie onto a package.
Wednesday, December 10, 2008
Gift Wrap Ideas From Your Kitchen Drawer


Need a quick gift wrap? Why not look in your kitchen drawers. The top design was made with a sheet of tin foil, glitter snowflake and bow and the bottom design is a just a zip top baggie (with the zip top cut off) a little tissue, tinsel, and a bow.
Monday, December 08, 2008
Make it: Denim Wine Bags - recycled
 Project: Recycled Denim Wine Bags
Supplies:
Old Jeans
Scissors
Fabric Glue
Sewing Machine
Wine Bottle
1 Yard Ribbon

1.Lay the jeans out flat (iron if necessary) and line up the wine bottle on the lower leg. Position the bottle so the top is about 3 inches down from the hem.

2.Cut the leg off about 1” from the bottom of the bottle.

3.Turn the leg inside out.

4.Stitch the cut opening with a 5/8th inch seam allowance. Turn the bag right side out and press if needed.

5.Remove the pocket from the seat of the jeans and trim around the back of the pocket so you are left with just one layer of fabric.

6.On the backside of the pocket, apply a bead of fabric glue around the outer edge and glue to the wine bag about 2” from the bottom and allow to dry. Place the wine bottle in the bag and add a wine opener to the pocket and tie a ribbon around the neck of the bottle.
Tips and Tricks: not so great at sewing….in a pinch you could staple the seam on the wine bag closed.
Sunday, December 07, 2008
Make it: Handmade Ribbon Bows

Handmade Ribbon Bow
Materials:long zipper, measuring tape or ribbon
hot glue
scissors
1. Twist one end of a piece of ribbon into a loop and secure with a drop of hot glue.
2. Create a figure-8 by making a second loop of ribbon the same size as the first loop. Twist loops together and secure with a drop of glue.
3. Continue creating loops and figure-8s until you have rounded out the bow, decreasing loop size until bow is full.
Monday, December 03, 2007
Origami folded gift box tutorial
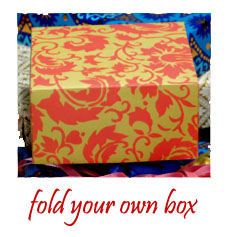 Need a quick box? Origami fold your way to an easy box made with 2 pieces of scrapbook paper. It is easy and priced right.
What you will need:
2 12"x12" square sheets of paper
bone folder or old credit card


2. Fold the four corners in until they meet in the center of the paper, crease sharply and unfold.
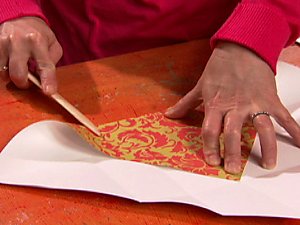
3. Beginning with the paper unfolded, fold one of the corners until it meets the farthest crease line opposite that corner. Crease, unfold and repeat the process with the remaining three corners.

4. Fold each corner to its closest crease line before unfolding all corners to reveal an overall pattern of creased squares.
 5. Open the folds and place "wrong side" up on the table.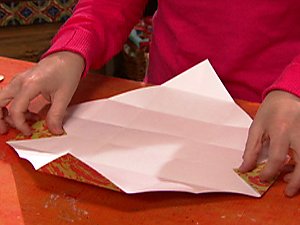
6. Fold two opposite triangular corners at their first crease lines.


6. Fold again at the next crease lines. Use the last crease to stand up box sides.
 7. Using your thumbs, gently fold in the remaining box sides along crease lines, forming the sides of the box. Crease and fold in the last triangular corner flaps to complete the box.
Have a great holiday,
Cathie Filian
on the web
shop crafty
Subscribe to:
Posts (Atom)
LinkWithin
