Showing posts with label 101 Purses and Totes. Show all posts

Friday, March 11, 2011

Painting with Paper Cups: Tote Bags


Wanna make perfectly cute circles?
Use paper cups dipped in paint to make oodles of designs.

Materials:
1 canvas tote bag
3 small plastic plates
Orange FolkArtpaint
Brown FolkArt paint
Tan FolkArt paint
FolkArt Textile medium
3 plastic cups various sizes
Iron
Stack of old newspapers
Circular Bamboo purse handles

Steps:

1. Press the bag to remove any wrinkles and place the newspaper in the bag to prevent the paint from seeping thru to the other side. Tuck in the straps to prevent any drips.


3. Pour a small amount of each of the paint colors on to the plates. Then add some textile medium to the paints. This will make your acrylic paint permanent. Mix well.


4. Dip the “Ring” opening of the cup into the paint, shake off any excess paint and press onto the bag to create stamped ring shapes.  Our Pattern is: Largest Cup = Dark Brown Paint, Medium Cup = Orange Paint and Smallest Cup = Tan Paint. Let dry for 25 hours and then heat set.


5. For the bamboo handles: Go into the existing handle area and fold the handles over the bamboo rings. Pin them into place.
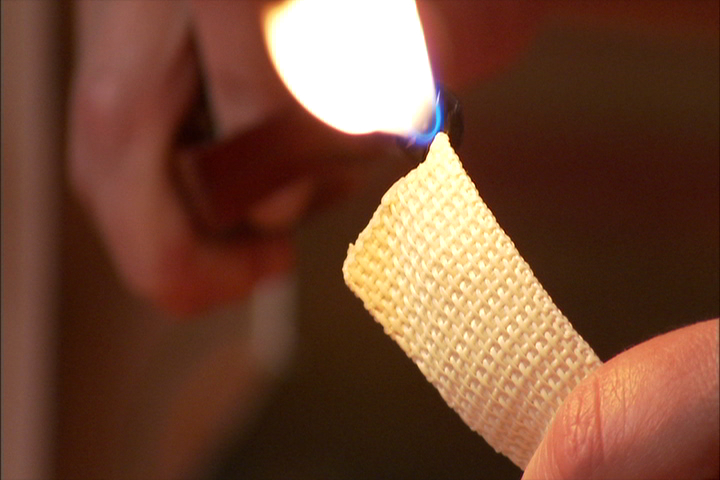

6. Cut away excess handle. Remove pins and “seal” off edges - With a flame, sear the edge of the nylon webbing, to prevent fraying.


7. Pin handles back into place and with a needle and thread stitch handles onto tote.

Thursday, August 26, 2010

Back To School Tie-Dyed Tote at Michaels!

Love this tote? Wanna make it? It is as easy as 1,2,3! Head over to your local Michaels Craft Store and pic up the compete instructions. Look for the instructions in the fashion and Rit Dye aisle.
A few behind the scene pics of the making....

Link


Tuesday, July 27, 2010

Make This: Hot Glue and Tattered Rose Purses

Using my Tattered Rose Tutorial make 2 large flowers and 2 smaller ones. Hot glue the flowers on top of each other. Glue a chunk button in the center. Embellish a purse with hot glued feathers. Nect, hot glue the tattered flowers to the purse.


Close Up!

Clutch bag! Add a little tulle behind the flower!

Wednesday, June 23, 2010

Make This! Playing Card Purse

Heading to Vegas or Atlantic City this summer? You really should whip up this show stopping laminated card purse!

On the set of Creative Juice - Vegas Baby Episode 603


Supplies:
1 Deck of Old Playing Cards (26 needed)
Hole punch
3/16” eyelets (154 needed)
Eyelet setter & hammer
¼” decorative red ribbon (7 yards)
Yarn or plastic canvas needle
Scissors
Laminating Sheets
2 sheets of 8.5 X 11 inch decorative paper
2 sheets of 4.25 X 8.5 inch decorative paper
1 sheet of 4.25 X 11 inch decorative paper
Glue stick
Two 10” lengths of ¼” diameter clear plastic tubing
1/8” dowel or bamboo skewer


1. Purse front and back: Glue stick 8 cards to one sheet of 8.5 X 11 inch sheet of paper. Repeat for the second sheet of paper. Laminate the sheets, trim the excess lamination from the edges.


2. Purse bottom: Glue stick 4 cards across the 4.25 X 11 inch sheet of paper. Laminate the sheet, trim the excess lamination from the edges.


3. Purse sides: Glue stick 3 cards 4.25 X 8.5 inch pieces of paper. Laminate the sheets, trim the excess lamination from the edges.

4. Use an eyelet hole punch and an eyelet setter to attach the eyelets. Use a marking pen to mark each eyelet placement before setting them. On the sides of each panel that measure 11”, set the first eyelet ½” from the edge and set 11 eyelets total spaced an inch apart. On the sides of the panels that measure 4.25”, set the first eyelet at 5/8” from the edge and set 4 eyelets total spaced an inch apart. For the sides of the panels that measure 8 ½”, set the first eyelet ¾” from the edge and set 8 eyelets total spaced an inch apart.

5. Thread the ¼” ribbon through the yarn or plastic canvas needle. Beginning with the purse front and sides, lace them together with the 1/4” ribbon. At the first hole, leave a 5” tail of ribbon at the back of the hole to use for tying later. Lace through one side panel eyelet, through a front panel eyelet and repeat for security. Whipstitch the remaining holes together. Do decorative lacing at the top edges, where no panels are being laced together. Keep lacing and add the remaining side and back. After the sides, front and back panels have been laced together, tie off the end of the ribbon after lacing it twice through the last hole.

6. Next lace the bottom to the purse, using the same technique.

7. To make a handle: thread a length of the ¼” ribbon through each length of tubing by folding an end over a dowel or skewer and pushing it through the tubing. Tie each end of the ribbon through an eyelet at the top of the purse to secure the handle.

Wednesday, June 09, 2010

Dye stripes with Elmers Glue and Rit Dye

Carousel Tote Bag for RIT Dye
Follow this link for complete instructions!

This simple technique of creating dyed stripes is so fun and addicting! The best part is that you will only need Elmers washable school glue, blue painters tape and rit dye to create the stripes. Embellish with Folkart fabric paints, freezer paper stencils, rhinestones, ribbons or anything that strikes your fancy.

Sunday, January 17, 2010

Tote Bag for Better Homes and Gardens


Visit Better Homes and Gardens for my easy tutorial on how to whip up this tote bag and ribbon key finder.

Saturday, March 07, 2009

Make It: Tween Recycled CD Purse

Make It: Tween Recycled CD Purse - Rockabilly Style

Materials:
Decorative fabric
black fabric CD case
2 Lucite™ handbag handles
iron-on fusible webbing
scissors
iron
fabric glue
FolkArt dimensional fabric paint - Licorice
iron
1-1/2 yd. 1/2" ribbon
embroidery thread

Steps:

Remove the "guts" (the plastic sheeting that hold the CDs) of the CD case.


Using fabric glue, apply ribbon to the inside seam to cover the old stitching. Set it aside to dry.


Iron a piece of fusible webbing to the back of the fabric, following the manufacturer's instructions. Trim around the image to be applied to the purse.


Peel off the paper and iron the fabric to the purse. If the fabric is nylon, use a pressing cloth to prevent melting. Using fabric glue, apply ribbon along the edge of the CD case. Miter the corners for a clean look.


Edge the ironed image with FolkArt dimensional paint. Let dry.


Stitch handbag handles to each side of the top of the case.

LinkWithin

Related Posts Plugin for WordPress, Blogger...