 psst.... I am working on a new book.
I can't spill the details yet - but this picture holds the clues.
Fall 2011
 psst.... I am working on a new book.
 Welcome Home Wednesday: custom painted doormat
  Quick Sewing Idea: Bath Time Puppets


 Make It For Mom: Floating Pearl Necklace
 Thread on a crimp tube, then a pearl then a crimp tube. Repeat until there are 7 pearls and 14 crimp tubes on the wire.
 Adjust the center pearl so that it lies at the “0” mark of the bead board. Use flat pliers to crimp the two crimp tubes on either side of it to secure it in the center of the wire. Slide the other pearls along the wire to their desired location. Secure by crimping the crimp tubes on either side of them, as you did for the center pearl.
 Slide the pearls on the wire so that they fall in between the pearls on the first wire length. Secure by crimping the crimp tubes on either side of them, as you did for the first wire length.
 To attach the clasp, thread one end of all three wire lengths through a size 3 crimp tube and through the loop of a magnetic clasp. Thread the wire ends back through the crimp tube. Crimp flat with the bottom portion of a crimping tool. Fold and crimp the tube by using the top portion of the crimping tool.
 Trim the wires with jewelry cutter.
 This little cutie can be whipped up in under an hour and is the perfect spring accessory. I used an Amy Butler paper and some of my stash flowers for this design. Of course you can tailor this design concept to any color palette or paper print. For best results, choose a flat wide headband. I have found inexpensive ones at the dollar store, target and at teen shops. Remember, even if the color is wrong on the one you purchase if won't matter because you are going to be covering it.
 Boutonniere-Making 101
 2. Trim the flower stems, at a 45-degree angle, with sharp clippers.
 3. Use floral wire to pierce the base of the main flower, just above the stem. Thread the wire through the flower so that equal lengths are on either side of the stem.
 4. Curve the ends of the wire down to follow the stem, and snip the wire so that it's the same length as the stem. Wrap the stem and wire with floral tape. Make sure the tape covers the end of the stem to help seal in moisture.
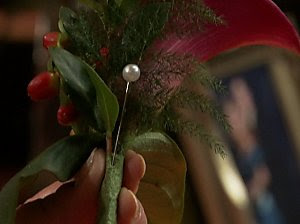 4. Layer the greenery behind the flower, trim the stems. Wrap all stems together completely with green floral tape. Place one small boutonniere pin through back of the stem into the flower head.
 Wrist Corsage
 Yea! Yea! Two shouts for no more burns!! Round two of the prototypes came in today and they are working swell!! The tweezers pick up the smallest rhinestones and the finger caps are really heat resistant! We still have a few more rounds till everything is perfect - but we are getting close.
 101 Snappy Fashions Hits the Stores!
 It was a labor of love!
 I even had to get more snapsuits on the way to a party!
 Just a small sample of the 156 designs ready to ship!
 It is hard to imagine that all this fit into a book!
 Before: Ikea Mirror
 After: Ikea Faux Tile Mirror
 Stuffed Bell Peppers are Easy, Yummy and Delicious!!
 You can use a variety of peppers. Red, Yellow, Orange or Green!
 Preheat oven to 350 degrees Fahrenheit. Remove the tops, inside stems and seeds from the peppers. Rinse clean.
 Steam the peppers to soften them. If you have a steamer pot, place the peppers in the steamer, fill the bottom with with water, boil and steam for 25 minutes. You can also place the peppers in a large pot, fill with water, bring to a boil and boil for 3 minutes. Drain the peppers on toweling.
 Defrost and strain the corn under cold water.
 Chop the onion, garlic and basil.
 Brown the ground beef. Drain any excess fat.
 Add the onions and garlic. Cook about 2 to 3 minutes.
 dried thyme
 Classico...my secret sauce.
 Combine the rice, corn, basil, thyme, and sauce into the pan.
 Fill the peppers and place in a glass baking dish.
 Pull from oven and top with cheese. Continue cooking (without foil) until the cheese melts.
