Friday, December 21, 2007

New Years Eve Party Ideas

New Year's Eve is just around the corner and that means it is time to celebrate!
 This youtube video is from a Party segment I did on NBC's IVillage Live.

Thursday, December 20, 2007

A Little Bit of Press


Netscape is getting a little crafty - I love that we are in the gossip section!

HOW TO DO IT YOURSELF: Emmy-nominated "Creative Juice" hosts Cathie Filian and Steve Piacenza proudly report the dynamic duo's DIY show -- that takes crafting to new levels -- is being shown in schools around the country.

"'Creative Juice' has aired as part of Cable in the Classroom," says Filian, of the program that utilizes cable TV shows to enhance schools' curriculum. "It's so great, because in a lot of these schools, the art programs are being eliminated," adds Piacenza, "but creativity and using your imagination is absolutely important for the growth of kids."

Click here to read the entire piece.

Framed Silhouettes Tutorial

Silhouettes Make The Cut
Cathie Filian


Silhouettes were all the rage in the early 1800s and by the looks of pop culture today they are back and in big business. Apple featured silhouetted hipsters grooving to their iPods. Many trucks feature the iconic "mud flap" girl and modern card and wrapping paper designers are featuring everything from silhouetted chandeliers to party girl accessories.

Silhouette artists have been creating cut masterpieces for more than 200 years, using their scissors to capture the image of a loved one without a camera. The process of cutting your way to a masterpiece has just a few steps and the results are simply stunning. You can create silhouettes of family members, friends and pets.

You can cut your image using the traditional matte black paper or show off your wild side with a small striped print or a hot pink glossy paper. Frames and backing papers can be coordinated to your room's color palette. For a cozy look consider attaching your cut pieces to a small canvas covered with a linen or velvet fabric.

If you want to create something a little less traditional like a silhouette of a chandelier, elegant sofa or even an airplane, look in magazines, newspapers and books for images to use for inspiration.

Silhouettes don't have to be tiny! Go big and bold by blowing up your image on a photo copier and use over-sized black paper. Large sheets of solid and embossed papers can be found at art supply and stationery shops.

You will want to work with a sharp pair of scissors and I recommend using a scissor designed for detail work that fits comfortably in your hand. No matter how you cut it, this age old art form is making a bold comeback. So grab some scissors and make the first cut.

Materials Needed:

photograph of a face or object (simple photos with minimal detail work best)

scissors

utility knife

black paper (the size of the photo)

background paper (size of the frame)

frame

glue stick

pencil

How To:

Choose a photo that is simple, preferably with a profile view of a person or object. Using scissors and/or a utility knife, cut around the shape of the subject in the photograph; this shape creates a template. Trace the template onto the black paper (tracing on the back of the paper will keep pencil marks from showing). Use scissors or a utility knife to cut out the traced shape. Apply glue to the back of the image, mount the image on background paper and place in a frame.

Wednesday, December 19, 2007

Letter - Clara Bow's House

I got this email and thought I would share.

Hi Cathie,

The wife and I watch your show all the time! I just read on the internet, that you live in Clara Bow's old house! Is that the house we see on your show? I ask because I'm a silent film nut, and Clara is one of my Fave Stars. If only that house could talk, eh?

Johnny


Hi Johnny,

That house was amazing! I say "was" because we have since moved due to the building being sold to a new developer. SO Sad!

In the late 40's the house was chopped up into large luxury apartments. They even had butlers quarters and separate entrances for cooks and maids. Steve and I both shared a floor, (kind of like a duplex) our apartments were originally the ballroom and if you look close you can see the large arches.

We filmed season 1 and 2 in the house. The rest of the seasons are filmed on a set that looks like a house. The Clara/Ivar house has the smaller kitchen with white and orange striped walls. And the set has the kitchen with the zebra wood cabinets. We also filmed the Holiday Special in the Clara Bow house. In the film noir episode you can see the front of the building when we are at the mail box.

The walls did "talk" - I never paid much attention to ghosts stories until I lived on Ivar. Lets just say the house had a personality that was full of life. During filming the spirits were a flutter! I think they were happy to have something filming in the house. We never got spooked it was just funny stuff that would happen. One time, I was so hot from the lights that I thought I was going to pass out. I jokingly said "Clara! please open the door and let some air in." Sure enough the balcony doors opened and the whole crew flipped out.

I am glad you and your wife are enjoying Creative Juice! We have so much fun making the show. It truly is a labor of love.

Happy Holidays,

Cathie Filian


Here are the doors the mysteriously opened.

Tuesday, December 11, 2007

Simple Party Appetizers

Party season is here and that means good food, best friends, family and a little holiday cheer. So I thought I would share a few recipes for quick and easy appetizers that will tempt anyones belly.

The cucumber cups add a wonderful pop of color to any party table (you can fill them with so many different foods). Hot radishes heat up your temp on a cold night. Slow cooker crab dip is always an easy party hit. The nuts are perfect for game day or in mini bowls scattered about a party. If you want to impress without the stress - make a edible flower glazed brie.

Enjoy,

Cathie


Cucumber Cups


Shop List:

English cucumber
toothpicks
tabbouleh, dip or chicken or tuna salad


1. Cut cucumbers into lengths about 2-1/2" long. Slice the skin from four sides of each cucumber chunk to form a square shape. 2. Scoop out the cucumber cup, leaving the cucumber intact on the bottom of the cup. 3. Fill each boat with tabbouleh, dip or chicken or tuna salad. Garnish with carrot or herbs.


Rose Radishes

Shop List:

radishes
sharp knife

1. Wash and trim the radishes from their greens. 2. Slice off five sides of each radish to get a five-sided shape, leaving a stripe of red between each side. 3. Make a thick slice on each side, being careful to not cut all the way through to the bottom, to form the petals.


Herbed and Toasted Mixed Nuts


Shop List:

1 c. each pecan halves, walnuts, cashews and almonds
1 Tbsp. finely chopped fresh rosemary
1 tsp. dried thyme leaves
1 tsp. dried oregano
1/2 tsp. cayenne pepper
2 Tbsp. brown sugar
2 tsp. sea salt
3 Tbsp. unsalted butter, melted


1. Preheat oven to 375 degrees. Spread the nuts on a baking sheet and toast for 10 minutes or until they are lightly golden brown. 2. In a large saucepan, combine the herbs, cayenne, brown sugar, salt and melted butter; cook and stir over medium heat for 1 minute. 3. Add the toasted nuts; cook and stir constantly over medium heat for another few minutes to coat and glaze the nuts. Serve either warm or cooled.


Slow-Cooker Crab Dip in a Sourdough Bowl


Shop List:

3/4 c. mayonnaise
8 oz. cream cheese, softened
2 Tbsp. dry white wine
1 onion, minced
1 lb. lump crabmeat, any cartilage and shell bits removed
round sourdough loaf,
cilantro or flat-leaf parsley for garnish


1. Mix mayonnaise, cream cheese and wine in a medium bowl until blended. Place in a

1- to 3-quart slow cooker. 2. Stir in onions and blend well. Gently stir in crabmeat. 3. Cover the slow cooker and cook on low for 4 hours. 4. Meanwhile, hollow out the round sourdough loaf and chop the resulting bread pieces into cubes.


Flower-Glazed Brie


Shop List:

1-lb. wheel of Brie
1 c. dry white wine
1 tsp. unflavored gelatin powder
edible, organic flowers (pansies, nasturtium, lavender, rose petals)
herb leaves (cilantro, dill, chives, flat-leaf parsley, basil)


1. Place the Brie on a plate. 2. Very carefully rinse the flowers and herbs and pat dry with paper towels. 3. Pour white wine into a small saucepan and sprinkle with gelatin. Let stand 5 minutes or until the gelatin is softened. Place the saucepan over low heat, stirring until the gelatin is completely dissolved. 4. Remove the saucepan to a bowl of ice water. Stir the gelatin mixture very slowly until it thickens but still remains pourable.

5. Spoon the gelatin glaze evenly over the wheel of cheese and smooth with the back of a spoon. 6. Carefully arrange the flowers and herbs on top of the glaze. Add more gelatin to the top of the flowers, if necessary. Refrigerate 15 minutes. 7. Transfer the cheese to a platter or serving plate and keep refrigerated until ready to serve.

Sunday, December 09, 2007

Potato Leek Soup Tutorial - YUM!

Winter is here and it is finally beginning to feel like Christmas. This weekend it rained like crazy here in Los Angeles (rain is our snow) and that means homemade soup and cozy sweatpants.

Here is my recipe for Potato and Leek soup - so yummy!


Eddie and I in the kitchen. He loves my soup!

Shop List:
6 medium potatos
2 leeks
2 cloves garlic
1/2 tsp salt
dash pepper
4 cups organic chicken broth
2 cups whole milk or half and half if you dare
1/2 cup cream fraiche
chives

Steps:
1. Chop off the tops and ends of the leeks, leaving the white section. Keep a handful of the tops and discard the remaining tops and ends.

2. Slice the leeks (see the above pics) and crush the garlic.

3. In a stock pot, add the butter, leeks and garlic. Heat on low/med until soft.

4. Peel and chop the potatos into small cubes.

5. Add chicken stock, salt and potatos to the pot. Toss the a handful of tops into the pot. Bring to a boil and cook until tender.

6. Once cooked, remove the tops with tongs.

7. Remove from heat and very slowly add a small amount of the milk. Blending well, continue adding milk and add the cream fraiche at the end.

8. Ladle all but 1 cup of the soup into a glass blender (or use an immersion blender or a food processor) Puree until smooth.

9. Add the un-pureed cup to the soup and ladle into soup bowls. Top of with fresh ground pepper and a few chopped chives.

Enjoy and cuddle up,

Cathie

Friday, December 07, 2007

Handmade Holidays

The tree lighting was a success! We got to see some friends, mingle with Santa and share a few laughs. Steve has all the videos trapped in his camera, I am hoping to post them to youtube later today.


This Saturday is going to be nuts - I can hardly contain myself. Fed Ex is delivering me my first peek at my new book. I'll just have a few days for any additional notes etc. and then it is off to the printer on December 21! I am so excited to see all the pictures of the dogs dressed to the nines. And we have an official title.....
Bow Wow WOW! - Fetching Costumes for Your Fabulous Dog.

Also next week - Don't miss:
Creative Juice for the Holidays on DIY
December 10th at 1:30 eastern and December 13th at 1:00 eastern and
Holiday Giftnanza on DIY
December 10th at 2:30 eastern and Dec 13th at 2:00 eastern


Thursday, December 06, 2007

Craftnanza Givaway!


DIY Network is spreading some crafty LOVE with their Craftnanza Giveaway! You could win a tropical cruise for 2 and 10,000 dollars!

Los Angeles Times Interview! Holiday Ideas


Our interview with the LA Times came out today! We had so much fun with them. They featured 3 of our projects. The projects are quick and easy and you can get all of the supplies at any craft or fabric shop.

Join us on Facebook, instagram, pinterest and twitter!

Happy Holidays!
Cathie and Steve


Monday, December 03, 2007

Origami folded gift box tutorial

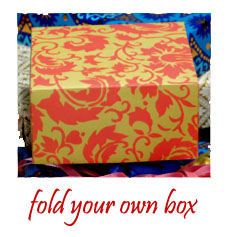
Need a quick box? Origami fold your way to an easy box made with 2 pieces of scrapbook paper. It is easy and priced right.
 

What you will need:
2 12"x12" square sheets of paper
bone folder or old credit card


1. To make the box lid, fold one paper square in half diagonally, first one way and then the other, sharply creasing the folds with a bone folder or an old credit card before unfolding.


2. Fold the four corners in until they meet in the center of the paper, crease sharply and unfold.
3. Beginning with the paper unfolded, fold one of the corners until it meets the farthest crease line opposite that corner. Crease, unfold and repeat the process with the remaining three corners.

4. Fold each corner to its closest crease line before unfolding all corners to reveal an overall pattern of creased squares.
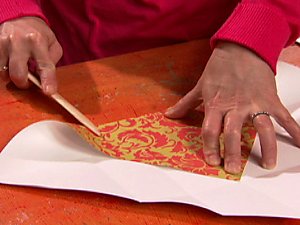
5. Open the folds and place "wrong side" up on the table.


6. Fold two opposite triangular corners at their first crease lines.


6. Fold again at the next crease lines. Use the last crease to stand up box sides.
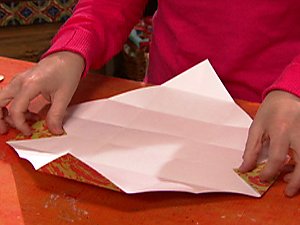
7. Using your thumbs, gently fold in the remaining box sides along crease lines, forming the sides of the box. Crease and fold in the last triangular corner flaps to complete the box.


8. To make the bottom of the box, trim a 12"x12" piece of scrapbook paper to 11-1/2"x11-1/2" and repeat the steps for the top of the box.

Have a great holiday,

Cathie Filian

on the web
shop crafty


Saturday, December 01, 2007

Peppermint Bark Tutorial

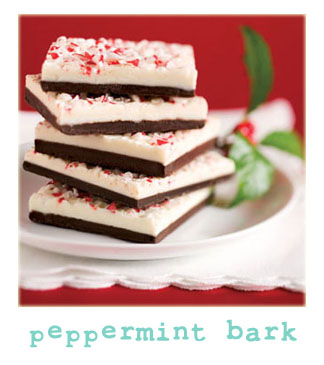
I love this time of the year! I feel like a busy kitchen elf, baking cookies, making sweet breads and my famous peppermint bark. Homemade treats never last long so I always suggest doubling sweet treat recipes!

*peppermint bark tutorial*


Shop List:

12 oz. quality white chocolate, finely chopped
30 red-and-white-striped hard peppermint candies, coarsely crushed (about 6 ounces)
12 oz. bittersweet or semisweet chocolate, chopped
1/2 cup whipping cream
1 Teaspoon peppermint extract


Kitchen Tools:

Measuring cup
Rubber spatula
Sharp knife
Aluminum foil
Cookie sheet

Bowl

Sauce pan


Packaging:

Glass jar
Ribbon,

Tag

Ornament


Note: This recipe makes around 1-1/2 pounds.

Line the cookie sheet with a 12" length of foil.

Combine bittersweet/semisweet chocolate, whipping cream, and peppermint extract in a bowl set over saucepan of barely simmering water - (homemade double boiler) - do not allow bottom of bowl to touch water) until chocolate is melted and smooth. The chocolate will feel warm to touch. Remove from over water.

Pour the chocolate onto the foil. Using the rubber spatula spread an even layer of chocolate over the foil. Sprinkle half of the crushed peppermints over the chocolate. Chill in the refrigerator until set, about 20 minutes.


Remove the chocolate and peppermint from the refrigerator. Melt the white chocolate in a bowl set over saucepan of barely simmering water (do not allow bottom of bowl to touch water) until chocolate is melted and smooth. Remove from over water. Pour all of the white chocolate over the chilled chocolate and peppermints. Using the rubber spatula spread the white chocolate in even layer. Top with the remaining crushed peppermints. Refrigerate until very cold and firm, about 25 minutes.

Once hardened, use your hands to break the bark into chunks. Allow bark to stand 15 minutes at room temperature before serving. (Note: This recipe can be made 2 weeks ahead and chilled in an airtight container.)

For gift giving, package the peppermint bark in clean glass jars. Glue stick wrapping paper scraps to the metal lid. Attach a bow, ornament and a tag.

LinkWithin

Related Posts Plugin for WordPress, Blogger...