
 Seed Packets are the inspiration for this garden party! Whip up some garden pretties with a little paint, mod podge and seed packets. All of the bases for the projects were purchased at the thrift shop or dollar store. The seed packets were 10 for $1.00 from my local dollar store. All the projects were designed for Plaid. Click the links for complete instructions and materials lists.
 French inspired flower bucket
Materials:
2485 - FolkArt Acrylic Colors - Seashell Pink, 2 oz.
413 - FolkArt Acrylic Colors - Pink, 2 oz.
516 - FolkArt Acrylic Colors - Light Lavender, 2 oz.
661 - FolkArt Metallics - Sequin Black, 2 oz.
892 - FolkArt Finishes - Outdoor Sealer - Gloss, 4 oz.
902 - FolkArt Acrylic Colors - Taffy, 2 oz.
991 - FolkArt Mediums - Glazing Medium, 8 oz.
CS11203 - Mod Podge Gloss, 32 oz.
Metal Flower Container
Foam Paintbrushes
Small Round Paintbrush
Cotton Rag
Seed Package
Scissors
Ribbon
Hot Glue
Silk Flower
Large Rhinestone
Steps:
1. Working in equal parts, blend together the pink and seashell pink paint. Paint the metal flower container with the blended pink paint. Add a second coat if needed. Once Dry, loosely paint the top of the container with the Light Lavender paint. Keep your brush strokes soft and not perfect for a vintage look. Using a small round paintbrush, paint small black dots onto the container.
2. Blend together the 1 part glazing medium with 1 part taffy paint. Using a cotton rag, apply the taffy glaze over the entire container. This will create a soft vintage look.
3. Cut out the front from the seed packet. Apply a thin coat of Mod Podge to the center of the container. Apply Mod Podge to the back of the seed packet, position onto the container and topcoat with a layer of Mod Podge. Use your fingers to press out any air bubbles. Smooth your brush strokes. Allow to dry for 12 hours.
4. Add two coats of outdoor gloss sealer to the entire container. Once dry, hot glue a decorative ribbon across the top of the container and a flower and rhinestone near the decoupaged seed packet.
 simple tea light holder
Add a little romantic light to your garden with this simple tea light holder. I picked up this glass container at the thrift shop for .50 cents and with in 3 minutes it was transformed into this cutie.
Materials:
Mod Podge Gloss
Tea Light Holder
Seed Packet
Rhinestones
Hot Glue Gun
Steps:
1. Cut out the front from the seed packet. Trim to fit the front of the tea light holder.
2. Apply a thin coat of Mod Podge to the center of the tea light holder. Apply Mod Podge to the back of the seed packet, position onto the tea light holder and topcoat with a layer of Mod Podge. Use your fingers to press out any air bubbles. Smooth your brush strokes. Allow to dry for 12 hours.
3. Using hot glue, add rhinestones to highlight the seed packet.
 Party Tray
Oh, I can see a cold pitcher of lavender lemonade being served or perhaps a pitcher of sangria. This was re-crafted from a dark wood heavily scratched tray that was $3.00 at my local thrift shop.
Materials:
478 - FolkArt Acrylic Colors - Lime Yellow, 2 oz.
892 - FolkArt Finishes - Outdoor Sealer - Gloss, 4 oz.
902 - FolkArt Acrylic Colors - Taffy, 2 oz.
954 - FolkArt Acrylic Colors - Fresh Foliage, 2 oz.
991 - FolkArt Mediums - Glazing Medium, 8 oz.
Mod Podge Gloss
Wood Party Tray
Foam Paintbrushes
Cotton Rag
Seed Packages
Scissors
Steps:
1. Tape off or remove any handles your tray may have. Paint the inside base of the tray with the Lime Yellow paint. Add a second coat of needed. Paint the inside sides and outer side of the tray with the Fresh Foliage paint. Apply two coats if needed.
2. Blend together the 1 part glazing medium with 1 part taffy paint. Using a cotton rag, apply the taffy glaze over the entire tray. This will create a soft vintage look.
3. Cut out the fronts of the seed packets. Arrange them in a pattern on the inside base of the party tray. Apply a thin coat of Mod Podge to the tray. Apply Mod Podge to the back of the seed packet, position onto the tray and topcoat with a layer of Mod Podge. Use your fingers to press out any air bubbles. Smooth your brush strokes. Continue with the remaining seed packets. Allow to dry for 12 hours.
4. Add two coats of outdoor gloss sealer to the entire tray. Once dry, reattach handles if needed.
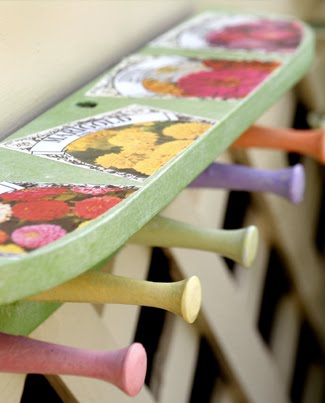 peg hook
This little peg hook is perfect for hanging all your garden tools. This began as a holiday themed jacket rack from the thrift store.
2489 - FolkArt Acrylic Colors - Peach Fuzz, 2 oz.
317 - FolkArt Acrylic Colors - Morning Sun, 2 oz.
413 - FolkArt Acrylic Colors - Pink, 2 oz.
478 - FolkArt Acrylic Colors - Lime Yellow, 2 oz.
516 - FolkArt Acrylic Colors - Light Lavender, 2 oz.
892 - FolkArt Finishes - Outdoor Sealer - Gloss, 4 oz.
902 - FolkArt Acrylic Colors - Taffy, 2 oz.
954 - FolkArt Acrylic Colors - Fresh Foliage, 2 oz.
991 - FolkArt Mediums - Glazing Medium, 8 oz.
Mod Podge Gloss
Wood Peg Rack 5 pegs
Foam Paintbrushes
Cotton Rag
Seed Packages
Scissors
Ribbon
Hot Glue
Steps:
1. Paint the base of the peg rack with the Fresh Foliage paint. Add a second coat of needed. Paint each of the pegs with Pink, Morning Sun, Lime Yellow, Light Lavender and Peach Fuzz paint. Apply two coats if needed.
2. Blend together the 1 part glazing medium with 1 part taffy paint. Using a cotton rag, apply the taffy glaze over the entire peg rack. This will create a soft vintage look.
3. Cut out the fronts of the seed packets. Arrange them in a pattern on the top of the peg rack. Apply a thin coat of Mod Podge to the peg rack. Apply Mod Podge to the back of the seed packet, position onto the peg rack and topcoat with a layer of Mod Podge. Use your fingers to press out any air bubbles. Smooth your brush strokes. Continue with the remaining seed packets. Allow to dry for 12 hours.
4. Add two coats of outdoor gloss sealer to the entire rack. Once dry, hot glue a decorative ribbon across the peg rack.
 Cute garden markers
Garden markers are a cinch to make! By adding a coat of clear outdoor sealer they will last in the rain or shine.
2489 - FolkArt Acrylic Colors - Peach Fuzz, 2 oz.
892 - FolkArt Finishes - Outdoor Sealer - Gloss, 4 oz.
954 - FolkArt Acrylic Colors - Fresh Foliage, 2 oz.
Mod Podge Gloss
Garden Sign
Foam Paintbrushes
Seed Package
Scissors
Steps:
1. Paint the base of the sign with the Peach Fuzz paint and the edges with Fresh Foliage paint. Add second coats if needed.
2. Cut out the front from the seed packet. Apply a thin coat of Mod Podge to the center of the sign. Apply Mod Podge to the back of the seed packet, position onto the sign and topcoat with a layer of Mod Podge. Use your fingers to press out any air bubbles. Smooth your brush strokes. Allow to dry for 12 hours.
3. Add two coats of outdoor gloss sealer to the entire sign.
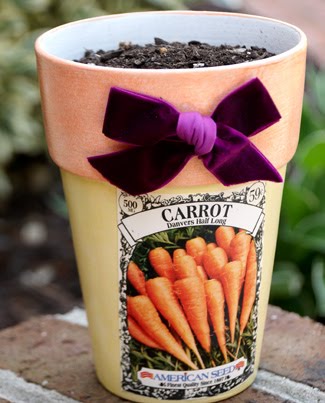 Glam clay pots
Jazz up boring clay pots with a little paint and a velvet ribbon. Who says you can't have a little velvet in the garden.
Cathie -
ReplyDeleteThese are just beautiful projects, I love them! Thank you so much for sharing with us.
Elaine Allen
This is perfect for a class we're working on for tomorrow. Now I have more wonderful ideas from you and will share with others. Perfec timing!
ReplyDeleteThanks so much Cathie for sharing you wonderful ideas! You are always such an inspiration to me!
ReplyDelete~~Dena
I love vintage seed packets. Thanks for these wonderful ideas for crafting with them. Your results are beautiful!
ReplyDelete