 Erin & I popped by Eddie's work to visit him on the set of MTV's Parental Control before we set out on our downtown LA shopping adventure. We only stayed a moment so we did not get to see the daters and parents in full action.
Monday, March 30, 2009
Visiting Eddie at Work
 Erin & I popped by Eddie's work to visit him on the set of MTV's Parental Control before we set out on our downtown LA shopping adventure. We only stayed a moment so we did not get to see the daters and parents in full action.
Wednesday, March 25, 2009
Embellishing Tricks for Plain Dresses

Embellishing Tricks for Plain Dresses
Materials:
nylon lace trim with a repeated, linked design
6"-8"-wide flat nylon lace
fabric dye
sequins
flat-bottomed Swarovski crystals
thread to match the garment
hand-sewing needle
jewel glue
toothpick
 1. Dye the lace according to the directions on the dye package. Allow the lace to dry.
 2. Pin the wide lace around the waist of the dress, beginning by folding and pinning it at one side of the zipper. Continue pinning until you reach the other side of the zipper. Cut the lace with enough to turn under. Turn under the end and pin to the other side of the zipper.
 3. Hand-stitch the top and bottom edges of the lace to the waist of the dress.
 4. To add scattered lace details to dresses or purses, cut links of the lace design.
 5. Embellish the lace or other portions of the garment with one crystal at a time. Dot the bottom of the crystal with jewel glue, using a toothpick. Apply to the lace link and allow to dry. Stitch the lace pieces onto the dress or use fabric glue to attach to a purse.
Tuesday, March 24, 2009
Bake it: Easy Biscotti
The crunchy cookies are delicious with a cup of hot coffee, tea or coco. You can alter the recipe by adding chocolate chips, bits of toffee, or other nuts. This recipe is as close to no-fail as you can get and perfect for a beginner.
Ingredients:
2 c. flour
3/4 c. sugar
1-1/2 tsp. baking powder
1-1/2 c. slivered un-blanched almonds
3 eggs
2 tsp. vanilla
1 Tbsp. lemon zest
Optional: chocolate for drizzling and a double boiler
Step:

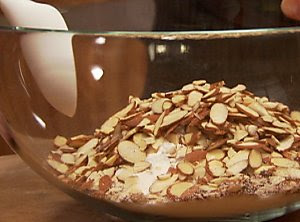 1. Preheat oven to 350 degrees Fahrenheit. In a mixing bowl, combine flour, sugar and baking powder. Add almonds.
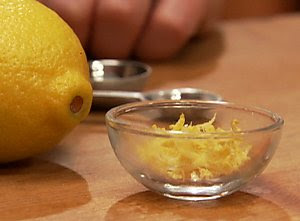

2. In another small bowl, whisk together the eggs, vanilla and lemon zest. Fold the egg mixture into the dry ingredient mixture.
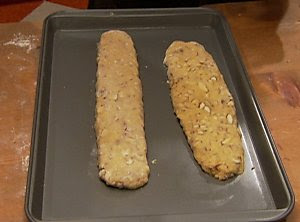
3. Stir until the dough is stiff. Place on a floured surface and split in two. Roll each piece into a log. Long and flat for smaller pieces or short and puff for larger pieces. Place the logs on the baking sheet and flatten them slightly, leaving a couple of inches between them .

4. Bake for 25 minutes. Remove from the oven and let cool. Leave the oven on. Slice each log into 1/3" slices diagonally.
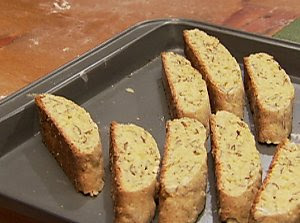 5. Place the slices (cut side down) on the baking sheet. Bake for another 10-15 minutes. Cool.
6. Optional: Melt chocolate in a double boiler and use a spoon to drizzle it onto the biscotti.
Monday, March 23, 2009
Sunday, March 22, 2009
Make it: Miniature Sponge Cake & Pie

Miniature Sponge Cake Materials:
flat, expandable sponges, yellow and pink
pen
quarter
scissors
Folkart - wicker white paint
craft glue
mini ribbons
mini beads
large button

 1. Trace the bottom of a paint bottle onto flat sponges (2 on the yellow and 1 on the pink). Cut out circles and glue the three together with the "icing" (pink) layer in the middle .
 2. Cut a small triangle from the circle (this will be a piece of cake). Wet the sponges, let expand and set aside to dry.
 3. Paint the top and sides (not the inside) of the cake with white craft paint and let dry. Using glue, attach ribbon (frosting) around the outer edge and glue beads in a daisy pattern to the top of the cake.
Miniature Pie Materials:
bottle caps
tan felt
red seed beads (or color to match fruit of choice)
Quick Hold craft glue
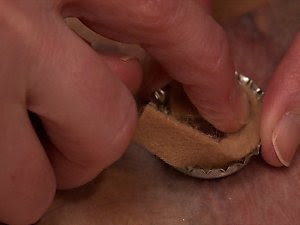 1. Cut a thin strip of tan felt to fit the inside rim of the bottle cap and glue in place.
2. Put a small amount of glue on the inside bottom of the cap, fill cap with seed beads and cover with glue.
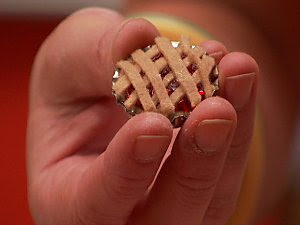 3. Cut very thin strips of tan felt; crisscross felt strips over the beads to form a woven crust.
Friday, March 20, 2009
Thursday, March 19, 2009
Make It: Altered Lockets
This little locket was made by re-crafting and old necklace I had. I have a jumbo baggie of old jewelry that is just waiting to be whipped into something new. To get the glassy finish I used Dimensional Magic. This project we designed for Plaid.
Supplies:
Mod Podge – matte
Mod Podge – gold glitter
Foam paintbrush
Detail paintbrush
Dimensional magic
Locket
Small scraps of paper
Scissors
Rhinestones
Gem glue
How To:
1. Begin by cutting a background paper that will fit the front of the locket. Attach the paper by applying a generous coat of Mod Podge to the back and front side of the paper. Position on the locket and use your fingers to press the paper around the curves of the locket. Don’t worry about crease lines.
2. Next add a smaller decorative image to the center of the locket using Mod Podge. Allow to dry.
3. Glue a boarder of rhinestones around the smaller image or in your desired pattern.
4. Using a detail brush, add a few clumps of the glitter Mod Podge to the edges to add highlights and depth. Allow to dry.
5. Squirt a small amount of dimensional magic on the smaller image. Use a detail brush to spread the dimensional magic in an even coat over the entire image. Allow to dry and attach to any necklace.
Wednesday, March 18, 2009
Make It: Mini Boudoir Art
This mini boudoir art was designed for Plaid crafts using my favorite color of metallic FolkArt paint - Metallic Peach Pearl. To see more of our Spring and Easter projects visit our page at Plaid Crafts.
Supplies:
FolkArt paint – Metallic Peach Pearl
FolkArt paint – Metallic Inca Gold
Mod Podge Matte
Foam paintbrush
Detail paintbrush
Wood plaque - small
Dress clipart
3 small rhinestones
Hot glue
1 Yard black velvet ribbon
How To:
Paint the plaque with 3 coats using peach pearl paint and a foam brush. Use the gold paint and a detail paintbrush to add highlights to the edge of the plaque. Allow to dry.
Print and cutout the dress clipart. (you may need to adjust the size depending on your plaque size). Coat the backside of the clipart with Mod Podge and place in the center of the plaque. Topcoat with two coats of Mod Podge. Allow to dry.
Using a detail brush and gold paint, paint 3 tiny dots down the front of the dress. Use a small drop of Mod Podge to glue 3 rhinestones across the waist of the dress. Hot glue ribbon around the outer edge of the plaque. Hot glue the remaining ribbon to the back of the plaque in a loop to create a hanger.
Tuesday, March 17, 2009
Make it: Spring Fling Headband
 Make it: Spring Fling Headband
This project we designed for Plaid using a headband from the $1 store. You will want to begin with a basic headband that is wider in shape. I coordinated the ribbons and flowers to the Amy Butler print.
Supplies:Headband
Mod Podge Matte
Foam Paintbrush
Scrap paper
Decorative Paper
Pencil
Scissors
Wax paper
Rick-rack trim
Hot glue
3 small silk flowers
3 medium rhinestones
Scrap of coordinating ribbon
How To:
1. Create a template of the headband by tracing it on a piece of scrap paper. Using the template as a guide cut the template from the decorative paper.
2. Working a a piece of wax paper and using a foam paintbrush, coat the back and front side of the paper with Mod Podge. Position the paper on the headband, press out any air bubbles with your fingers, smooth your brush strokes. Allow to dry.
3. Hot glue rick-rack trim to the edges of the headband. Hot glue silk flowers to the mid-top section. Hot glue a rhinestone to the center of the flowers. Hot glue a scrap of ribbon around the two ends of the headband to secure the rick-rack.
Monday, March 16, 2009
Make it: Ikea Table Hack with Mod Podge
We hacked the Ikea lack table with a little colorful paper and mod podge. This project can be done for under $27.00 and that includes the table! You can use any type of shape to decorate the table: circles, triangles, flower shapes, etc. We used a rounded diamond shape.
Materials:
small table
fine-grit sandpaper
blue painter's tape
primer
latex paint
large piece of cardstock or poster board
yardstick
large bowl (ours was about 11-1/2" in diameter)
pencil
several pieces of large scrapbook paper, cardstock or colored poster board
scissors
mod podge
glossy polyurethane
foam paintbrushes
craft knife
Steps:
1. To make a template for this shape, use a yardstick to draw a straight line across the length of the large piece of cardstock or poster board, and draw another line across the width of the paper that intersects with the first line, so that the paper is divided into four sections. Use the large bowl to draw an arc in each section of the paper. Cut the diamond out and trim about 1/8"-1/4" off each point to create blunt edges. This will make it easier to use the template.
 2. Trace several shapes onto the paper you have chosen for the table and cut them out. The size of the table will determine the number of cutouts you need.
3. Sand the top of the table with fine-grit sandpaper and wipe away the dust with a clean towel or rag. Use painter's tape to tape off the vertical edges of the table. Apply one to two coats of primer to the top of the table with a paint roller, allowing it to dry between coats. After the primer has dried, apply 1-2 coats of latex paint to the tabletop, allowing it to dry between coats. Allow to dry completely before moving on to step 4.

4. With a large foam brush, brush over the back of each shape with mod podge and place them down on the table, corner to corner. Smooth out air bubbles as you go along. Brush mod podge on the entire tabletop. Allow to dry and apply a second coat. Trim away any shapes hanging over the edges.
 6. Once the second coat of mod podge is completely dry, brush on a coat of glossy polyurethane on the tabletop, using the foam brush. Allow it to dry; then apply a second coat. Allow the second coat of polyurethane to dry for 2-4 hours before removing the blue tape. You may need a craft knife to help remove the tape.
Sunday, March 15, 2009
Subscribe to:
Comments (Atom)


